Xilinx Machine Learning TRD Guide
Abstract
The scope of this document is to provide the reader with the exact formula necessary to recreate the Xilinx Machine Learning Targeted Reference Design (TRD) for edge deployment. It will provide all necessary steps required for firmware implementation, platform creation, Machine Learning network compilation, and the integration of these three concepts. The goal of this paper is to equip the reader with enough information such that they may generate their own solution that is tailored for their specific edge solution. It will provide methods for generating performance and power metrics for Machine Learning applications targeted on Xilinx hardware.
Introduction
There are four main software tool flows that are required to take a Machine Learning concept from creation to implementation. You must use Vivado to create a programming Logic (PL) firmware targeted to your specific board and device. You can use PetaLinux to create a Linux distribution with appropriate ties to the Deep Learning Processor Unit (DPU) targeting the embedded processor (ARM) on your Xilinx device. You must use the DNNDK tools to transform your neural network to an ELF file that executes on the DPU instance. Lastly, you need to create a software application that will run on your target hardware to create the processing pipeline in which the DPU resides. In platform design, the end user can decide which operating system best meets the requirements of the project. In this paper we will use [MS1] Linux as our OS and AI SDK to cross compile test applications. During compilation, the AI SDK will compile all the required acceleration libraries, DPU drivers and one of many test applications. These applications will help to measure end to end performance of the processing pipeline.
The Xilinx AI Developer web page has all the resources you will need to download to begin your development. Please visit the link below:
/content/xilinx/en/products/design-tools/ai-inference/ai-developer-hub.html#edge
The Xilinx AI Developer web page resources are separated into 3 main sections, AI Tools, AI Evaluation Boards and AI Targeted Reference designs.
For this paper, we will be using the following tools / documentation and recommend the following downloads:
AI SDK package:
- Tools - xilinx_ai_sdk_v2.0.5.tar.gz
- Documentation: AI SDK User Guide (UG1354) v2.0
DNNDKV3.1:
- Tools: xilinx_dnndk_v3.1_190809.tar.gz
- Documentation: DNNDK User Guide (UG1327) v1.6
ZCU102 Kit:
- Demo card Linux image: petalinux-user-image-zcu102-zynqmp-sd-20190802.img.gz
- Documentation: ZCU102 User Guide (UG1182)
DPU Targeted Reference Design:
- Demo card hardware project: zcu102-dpu-trd-2019-1-190809.zip
- Documentation: DPU Product Guide (PG338 v3.0)
Hardware Architecture
The purpose of this section is to broadly explain the hardware architecture and clear up a common misconception with the architecture. Product Guide PG338 has a very detailed explanation of the Xilinx Deep Learning Processor Unit (DPU) and what ML operators it supports. It is important to realize that the DPU is not stand-alone IP and should be more appropriately thought of as a Co-processor for the Zynq Ultrascale+ MPSoC Cortex-A53 processors. In later sections of this document we will discuss how a Machine Learning application is compiled and targeted to this platform, however it is important to note that the applications themselves will be running on the Arm Cortex-A53’s which will send commands to the DPU IP for processing. The DPU is ultimately just a slave co-processor that lives in the Programming Logic (PL) of the Zynq Ultrascale+ device that is controlled by applications running on the Arm Cortex-A53’s hard processors that reside in the Processing System (PS) of the device. One nice thing about using Xilinx devices for ML applications is they have the flexibility to interface to a wide variety of data input sensors and can format that data to something that would work well for your trained inference network. When making architecture choices it’s important to realize that the Xilinx solution is an Application Processor controller (quad ARM Cortex-A53) with a co-processor (DPU) and with the flexibility to receive and format sensor data that will be consumed by the application processor.
Vivado Tools
The first part of creating a Machine Learning Application is to create a hardware platform. This is accomplished using Vivado. Product Guide 338 (ver3.0) chapter 6 documents the instructions for recreating the ZU102 Targeted Reference Design (TRD) platform. Creating the Vivado project is as easy as sourcing a tcl file and then generating a bit file. It is important to note here that after the bit file has been created, then you will export the hardware description file (.hdf). This is accomplished in vivado by doing File->Export->Export Hardware, click Include the bitstream and finally take note of where it is saved because you will need this file later in the process.
This TRD project is simple and easy to reconfigure to different sized DPU co-processors. Once the block diagram is open (see figure below), just double click on heir_dpu and then double click on the DPU. Here you can see if is easy to change the architecture of the DPU.

PetaLinux Tools
The second part in creating a Machine Learning Application is to create a software platform to run the Machine Learning applications on. PetaLinux is a tool for deploying Linux on Xilinx devices. Product Guide PG338 documents the flow for recreating the software platform for the Targeted Reference Design. The TRD download comes with a board support package (.bsp) that can be used to configure the Linux with the appropriate operating system hooks that are required for ML applications. PetaLinux is used [MS1] to configure Linux, to build Linux on the device, and to package the build into a binary that the MPSoC can boot.
Machine Learning Tools and Integration
In the above section you have compiled your hardware design with the DPU IP block targetted to the ZCU102 and compiled using Petalinux to target this hardware with the linux operating system to run the ML application code.
The next step is to compile your ML model and build your linux test application. Below is a simplified block diagram of this flow. You will notice the DNNDK Pruning and Finetune sections are light grey color indicating this is an optional add-on tool set.
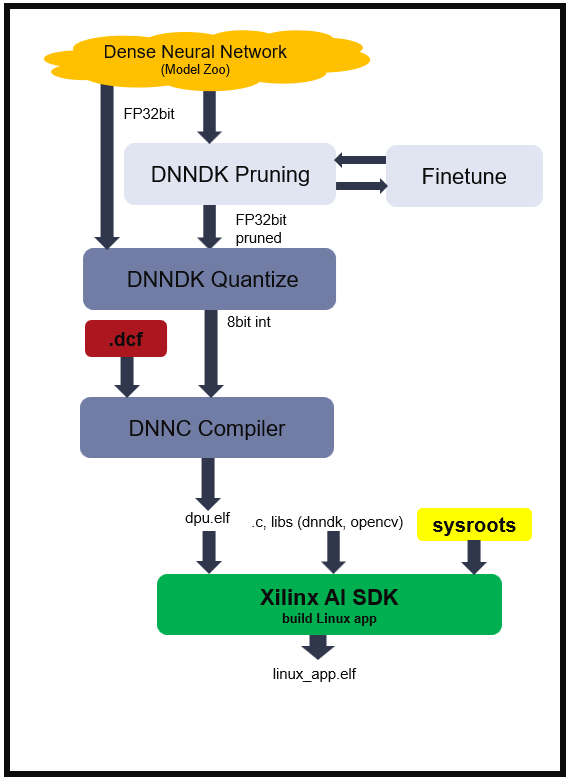
The above flow chart describes the building blocks of the ML development system which consists of 3 key sections:
- Dense Neural network (model zoo)
- DNNDK toolset (Pruning, Compiling and Quantizing)
- AI SDK
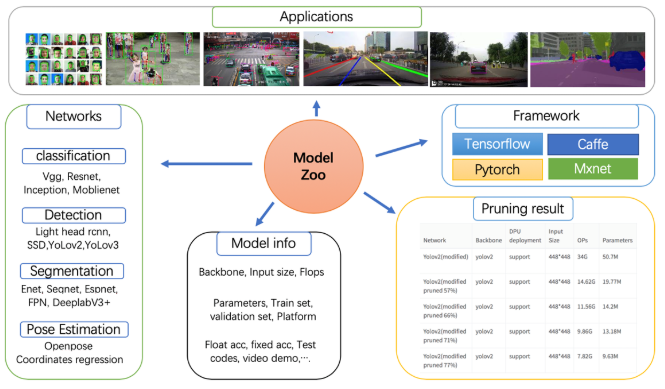
There are many neural networks located on the world wide web. Xilinx has taken and tested many of these networks and created a Github repository call the Xilinx Model zoo. This repository includes optimized deep learning models to speed up the deployment of deep learning inference on Xilinx devices. These models cover different applications, including but not limited to ADAS/AD, video surveillance, robotics, data center, etc. These models are open source and provide you with a starting place to develop your own customer models.
The Model zoo has a combination of model configurations such as pruned, deployed, 32bit floating supporting different frameworks ( Caffe, Tensor flow, pytorch and mxnet). Additional useful data such as, backbone, Input image size, workload and power measurement on Xilinx demo card are provided to give you a strong reference for project planning.
Xilinx Model Zoo: https://github.com/Xilinx/AI-Model-Zoo
DNNDK Tools Set
Deep Neural Network Development Kit (DNNDK) is a full-stack deep learning SDK for the Deep-learning Processor Unit (DPU). It provides a unified solution for deep neural network inference applications by providing pruning, quantization, compilation, optimization, and run time support.
The DNNDK pruning tool which is apart of the DECENT[MS1] tool is an optional tool set the customer can purchase to reduce computational work load of the model and reduce over all power of the ML instance. In cases where pruning is not required DECENT is used for quantization only.
The DECENT pruning tool deploys course gain pruning to remove whole kernels from the 32bit floating point model. This pruning process is controlled by the user while tracking model accuracy. After repeated pruning and finetune operations the 32bit float point is saved. The last step DECENT executes is quantization to transform the model from a 32bit floating model to an 8bit integer model. Currently the DPU supports 8bit integer models for maximum performance and power savings.
For the purposes of this paper we will not be training or pruning ML models. For additional details on network deployment please review Chapter 5 of UG1327. To obtain the Xilinx DNNDK pruning tools please contact your Xilinx FAE.
In applications that require a hardware platform level change such as the DPU configuration, the user must copy the .hwh file from the Vivado “hw_handoff” directory and run the DLet command. The Dlet command is a part of the DNNDK host tools and extracts the various DPU configuration settings and attributes which are saved in a .dcf file. This file is later used by the DNNC compiler to create efficient DPU instructions for the ML instance. Additional details on this command can be found in UG1327 (v1.6) chapter 7
AI SDK Tools
The Xilinx AI SDK is a set of high-level libraries and APIs built for efficient AI inference with the DPU. It provides an easy-to-use and unified interface by encapsulating many efficient and high-quality neural networks. This simplifies the use of deep-learning neural networks, even for users without knowledge of deep-learning or FPGAs. The Xilinx AI SDK allows users to focus more on the development of their applications, rather than the underlying hardware.
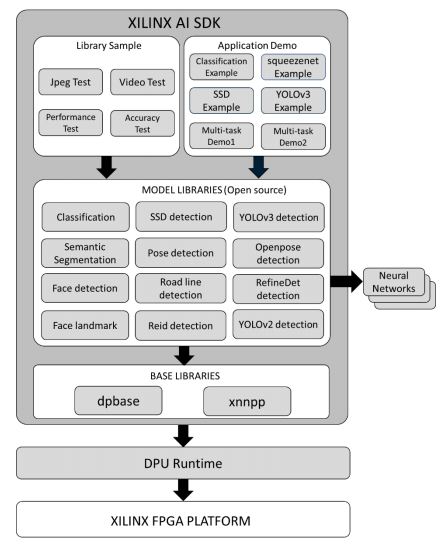
The Xilinx AI SDK allows customers to quickly prototype and deploy their models to the DPU. As seen above there are several AI applications and model examples to test and explore.
The AI SDK tool consist of 4 main sections:
- Closed Source Base Level Libraries.
- Open Source Model Libraries
- Application Demos
- Library Samples
The Base level Libraries provide an operating interface to the DPU and post-processing module of each model. This allows the user to control, send and received data to the DPU. The Open Source Model Libraries implement the neural network shown in the above diagram. The application demos illustrate the correct use of the AI SDK libs in an application and the Library samples provide an example on how to test and measure performance on the implemented model.
Using AI SDK
When using the AI SDK it is key to review chapters 2 and 3 of UG1354(v2.0) for correct installation and setup of both the host and target systems. Chapter 2 also details the running of the AI application code in which you will copy on to your SD card and execute on your Xilinx demo card.
The AI SDK comes with a basic Linux sysroot that will work with your Xilinx democards. The sysroot is a directory structures that provide the essentials for a system to run. There is a default sysroot, “/”, but you can build your own. What you need in a sysroot will depend on your application. To build a sysroot, create a directory and copy into it the executables, libraries and configuration files that you need for your system. It is important to understand that in customer application the sysroot should be updated to reflect your application hardware and to include supported libraries for Linux application development.
Host Machine
In many cases, the end-user doesn’t have a strong enough host machine to train and prune their neural networks. These functions have large work loads and require a high-end GPU card to complete this function. One option is to open an AWS Account and use their ML server instances. In many cases, this can be a quick and easy method to address this need. Please refer to Appendix A for instructions to create and setup your AWS instance. Appendix A will also give you step by step instructions on setting up a secure link and transferring files to your instance for processing.
Power and Performance
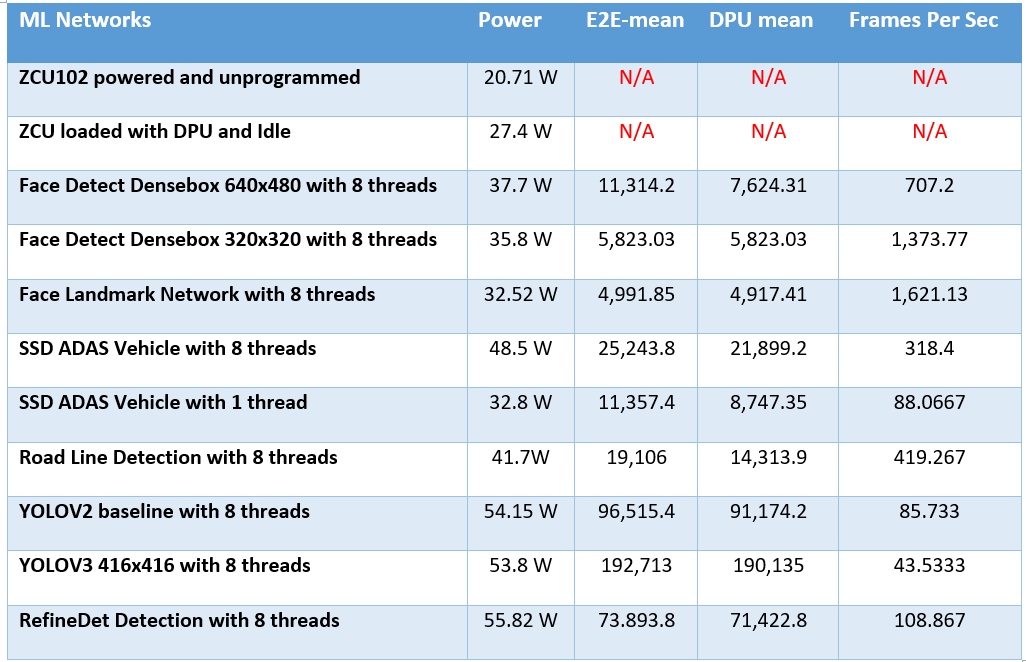
When developing ML applications for edge solutions it is important to understand the power consumption of the device and the performance you will see for the ML network you deploy. The following is a table of data gathered from the ZCU102 TRD that summarized the power and performance of various ML networks on this hardware platform.
Power was captured by using a Nashone Power energy meter with .1 W resolution. By taking the power of an unprogrammed board, you can estimate the static power of your board and Xilinx MPSoC. By taking the power of a configured device after Linux has booted, this provides you a good estimate of the active and static power of an idle Processing subsystem. Finally, when running the various ML networks, you receive a total system power in which you could subtract off one of the two baselines to get good estimate of the power utilization of the ML networks.
Conclusion
In conclusion, this paper highlights all the key building blocks offered by Xilinx for artificial intelligence. This cross-functional flow describes the creation of a hardware platform for a ML inference. It also explains, the complete build process of an OS running on Zynq MPSOC and the application layer to test the performance of your ML inference.
Appendix
AWS Account Creation and Setup
- Click here to create your AWS account: https://portal.aws.amazon.com/billing/signup#/start
- Tips:
- Have your credit card handy
- Select Basic level support (free)
- Save your login details for the next step.
- Once your AWS account is setup you’ll received an email from Amazon welcoming you. Click on the following link and visit the EC2 portion of AWS:
- In the left-hand menu of the AWS GUI locate “Network & Security” and select “Key pairs”:
- Click “Create key pair” and provide a name for the key. A *.PEM will be downloaded in your browser.
- Convert this PEM file into a PPK file if you are using Windows with putty to connect to the AWS instance. See step by step instructions below: (note: online reference: https://docs.aws.amazon.com/AWSEC2/latest/UserGuide/putty.html?icmpid=docs_ec2_console)
- Start PuTTYgen (for example, from the Start menu, choose All Programs > PuTTY > PuTTYgen).
- Under Type of key to generate, choose RSA.

If you're using an older version of PuTTYgen, choose SSH-2 RSA.
3. Choose Load. By default, PuTTYgen displays only files with the extension .ppk. To locate your .pem file, select the option to display files of all types.

4. Select your *.pem file for the key pair that you specified when you launched your instance, and then choose Open. Choose OK to dismiss the confirmation dialog box.
5. Choose Save private key to save the key in the format that PuTTY can use. PuTTYgen displays a warning about saving the key without a passphrase. Choose Yes.
Note
A passphrase on a private key is an extra layer of protection, so even if your private key is discovered, it can't be used without the passphrase. The downside to using a passphrase is that it makes automation harder because human intervention is needed to log on to an instance, or copy files to an instance.
6. Specify the same name for the key. PuTTY automatically adds the *.ppk file extension.
Your private key is now in the correct format for use with PuTTY. You can now connect to your instance using PuTTY's SSH client.
6. Install WinSCP for transferring the tutorial (pscp would also work).
https://winscp.net/eng/download.php
7. To run this tutorial, you will need the p2.xlarge instance. This instance is not free. To enable this instance, file a support case with AWS using this link.
http://aws.amazon.com/contact-us/ec2-request
8. Select the following options in your AWS case:
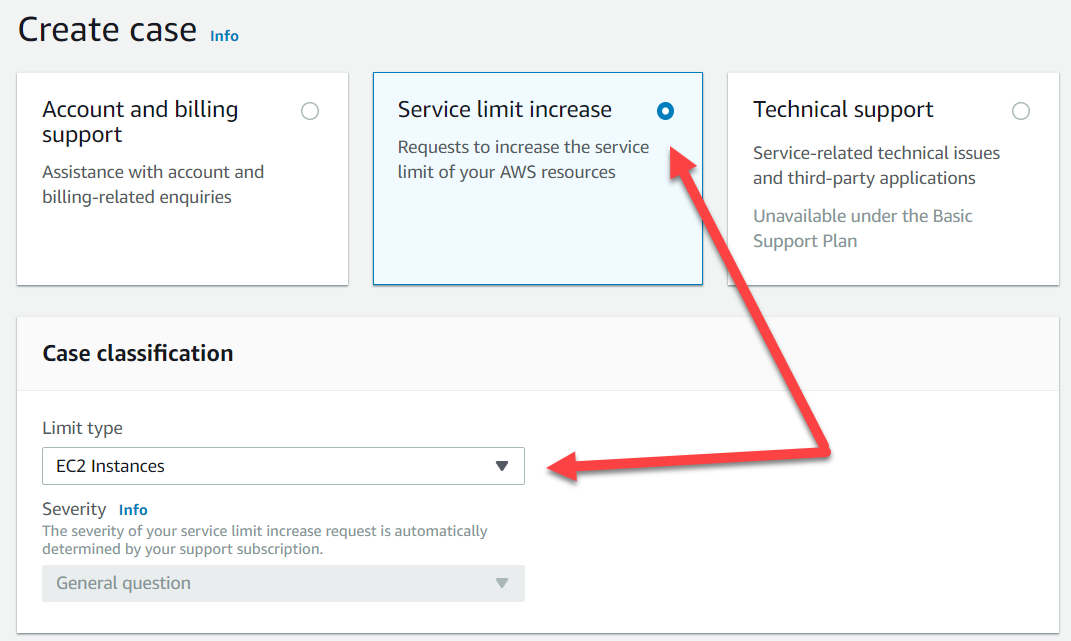
Note: the “Region” field can be different.
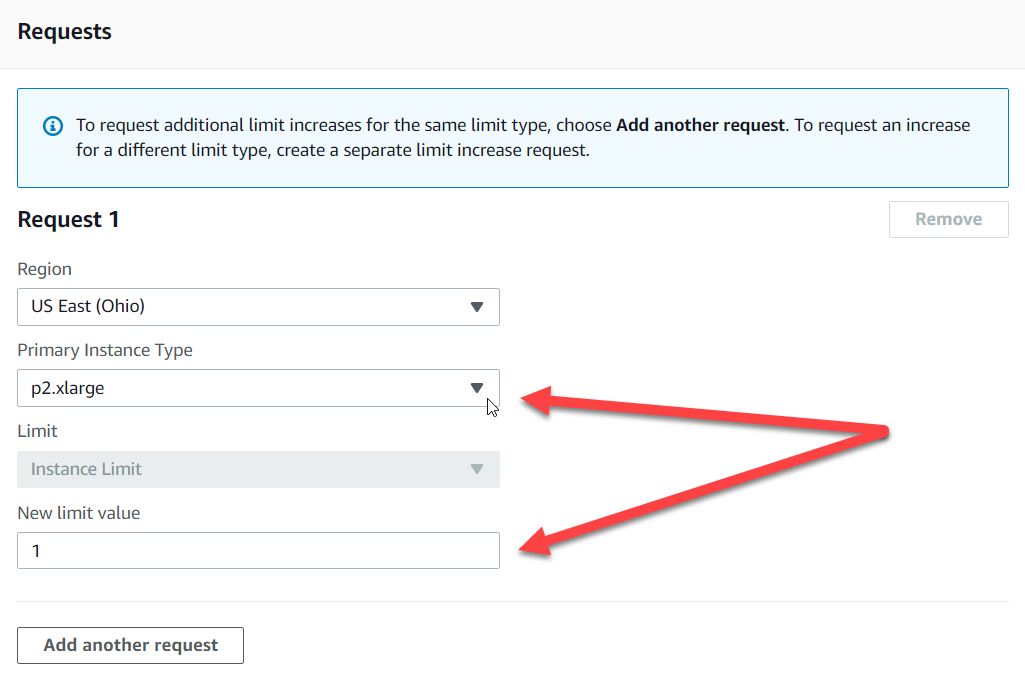
9. Amazon will approve your limit increase via email.
Example:

10. In the EC2 AWS console click on “Launch Instance”. Locate the below machine

11. Next locate the p2.xlarge instance and click “Review and Launch”
12. Select “Launch” and a message will appear confirming the private key name you’ve created above.
13. Confirm and acknowledge you have your private key and select “Launch Instance”
14. Click “View Instances” to see your AWS instance.
15. To start your instance, click on instance field, click on “Actions” button and select “Instance State” “Start”. For the next step, copy the highlighted IP address (Ctrl C).

16. Now connect to your Instance with WinSCP and transfer the demo files.
- Host name = your instance’s IP (highlighted in yellow)
- User name = ubuntu
- Password = (leave this blank)
17. In the advanced settings, point to your PPK file you created above in Steps 5&6.
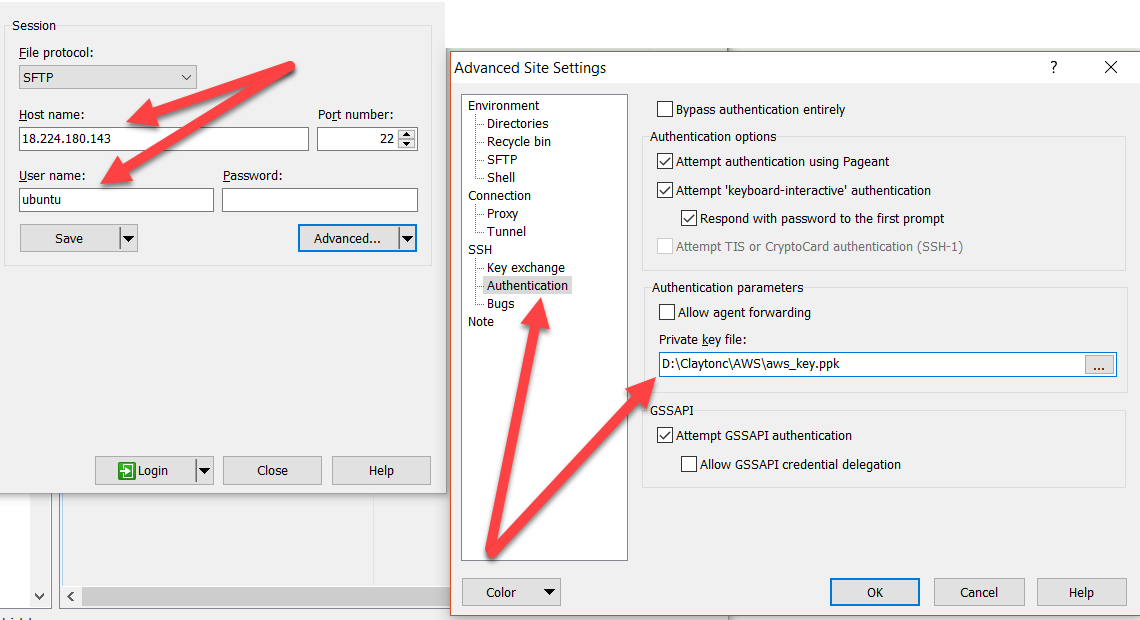
18. You will receive a warning message stating “Continue connecting to an unknown…” click “Yes”
19. Once connected, drag and drop your files to the AWS instance.

About Joel Ostheller
Joel Ostheller is located near Rochester NY and serves as a Senior Field Applications Engineer and Machine Learning Subject Matter Expert for AMD. Joel’s key focus is helping accelerate time to market for Tier 1 companies in Western, NY, and Cleveland, OH. Previously Joel spent 18 years developing FPGA and ASIC technologies for Harris Communications, SAIC, Northrop Grumman, and Comtech AHA. Joel has four children and enjoys a wide variety of interest including music, sports, travel, and technology.

About Clayton Cameron
Clayton Cameron is a Senior Staff FAE based in Toronto. He joined AMD in 2000, supporting telecom customers in the Ottawa office. As an FAE, Clayton greatly enjoys helping customers and solving problems. He also enjoys the diversity of his position and the variety of challenges he faces daily. In his spare time, he lets off steam at the Dojo achieving his 3rd Blackbelt in Juko Ryu Tora Tatsumaki Jiu-Jitsu. At home, he loves to spend time with his wife and three children.